
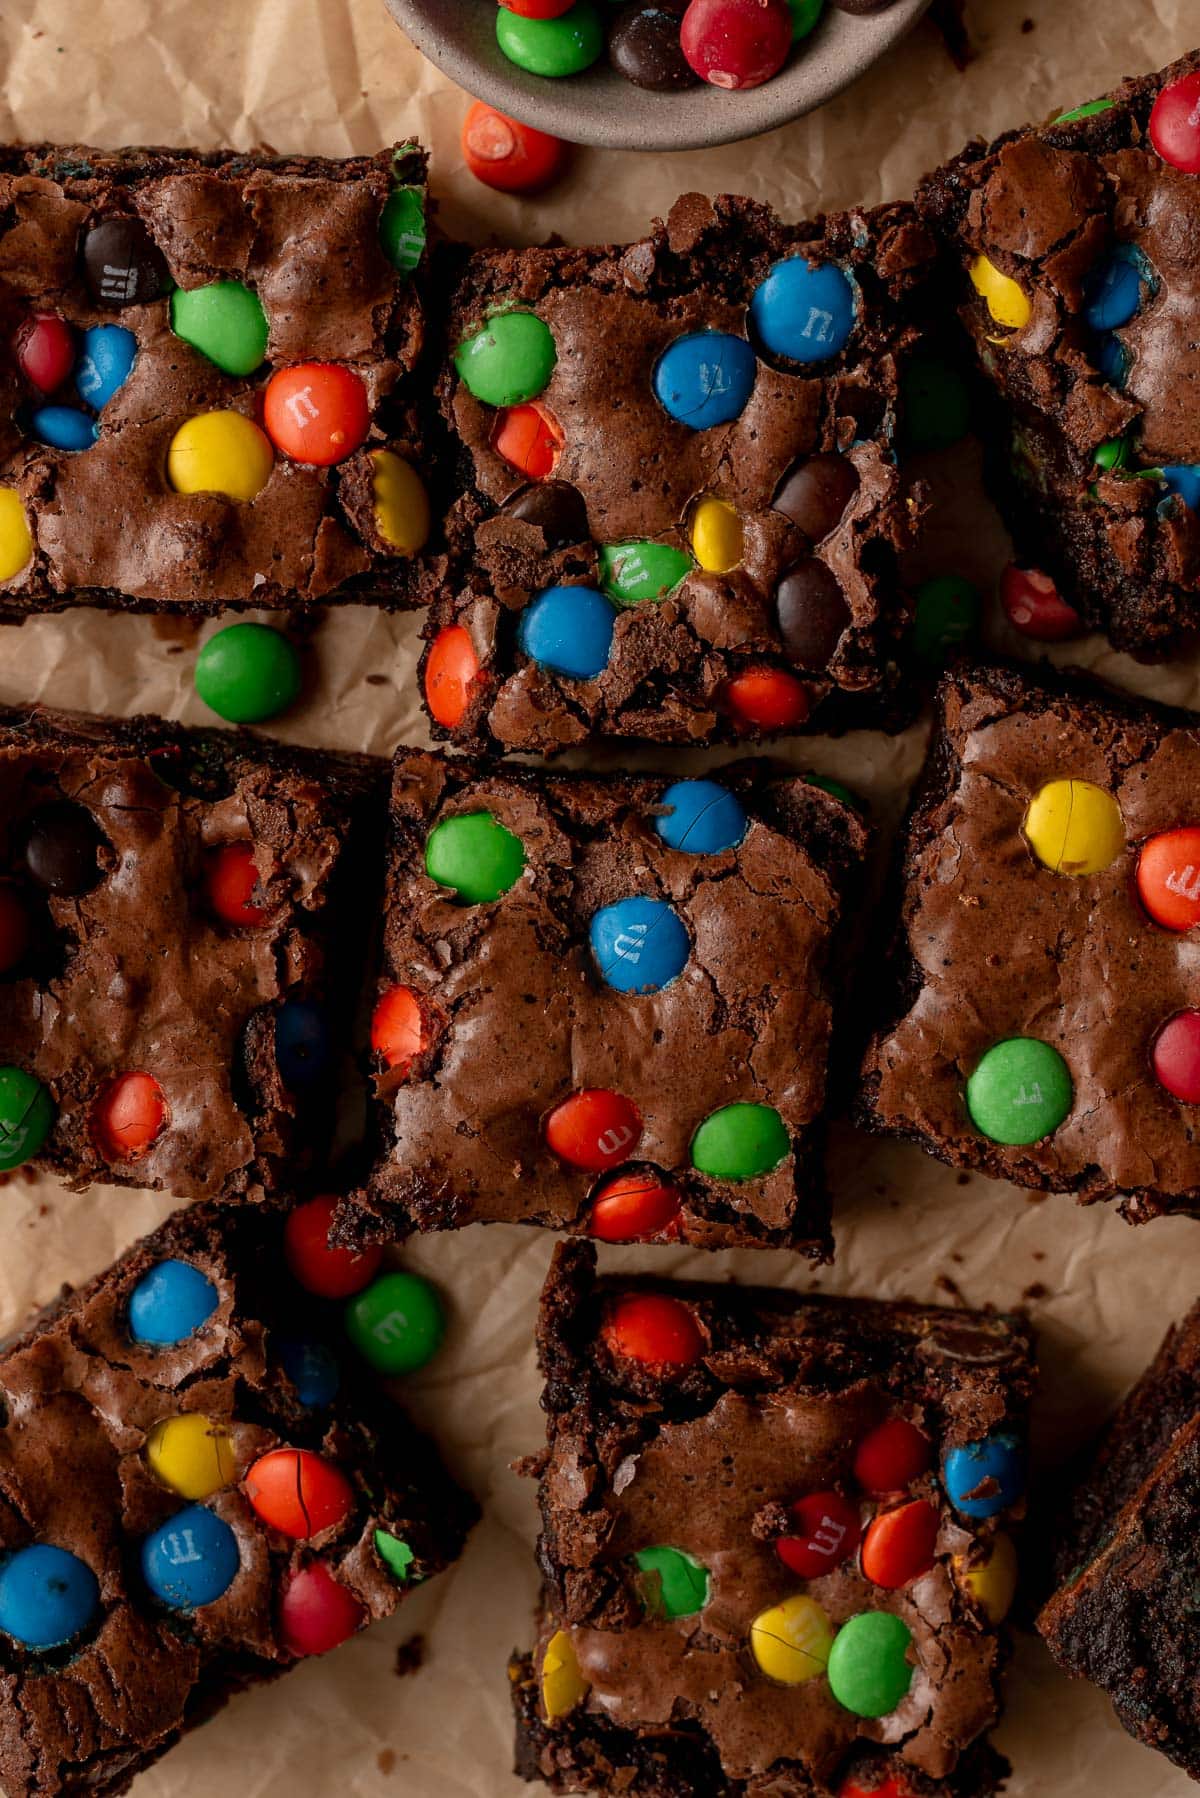
Bite into one of these M&M brownies and you'll find a thick, fudgy center, a delicate crackly top, and plenty of candy-coated chocolate in every bite. I love the little crunch from the M&Ms against the rich, chewy brownie, especially when the chocolate is still slightly warm. They're also so much fun to make for holidays when you can switch up the candy colors!
Why You'll Love These M&M Brownies
These are based on my favorite homemade brownies, with lots of M&Ms added for extra chocolate and a little crunch. They're one of those desserts that look especially fun without needing any decorating.
- Thick and wonderfully fudgy. Melted chocolate and cocoa powder give the brownies their deep chocolate flavor, while the butter, oil, and sugars help create that moist, chewy texture.
- That shiny, crackly top. Heating the sugar with the butter and chocolate, then whisking the eggs thoroughly into the mixture, helps develop that classic brownie crust.
- M&Ms in every bite. Some of the candies go into the batter, while the rest are scattered over the top so you get plenty of chocolate throughout.
- Perfect for holidays. Use seasonal M&Ms for Christmas, Valentine's Day, Halloween, or any celebration without changing the recipe.
- Easy to make in one saucepan. You don't need a stand mixer or any complicated equipment to make these brownies from scratch.
If you're craving peanut butter swirled into a fudgy chocolate brownie, try my peanut butter brownies. For peanut butter, oats, and chocolate in a chewy bar, my monster cookie bars are another fun option. If you prefer crunchy cookies mixed into your brownies, try my Oreo brownies.
Ingredient Overview

These brownies use both melted chocolate and cocoa powder for a rich, chocolatey base. A few ingredients are especially important for getting that fudgy texture and shiny top. You'll find the exact measurements in the recipe card below.
- Semisweet or dark chocolate: I love using dark chocolate for a more intense chocolate flavor, but semisweet works beautifully, too. I recommend chopped chocolate bars for smooth, even melting.
- Cocoa powder: I typically use Dutch-processed cocoa powder for its smooth, rich chocolate flavor. Natural unsweetened cocoa powder can also work, although it will give the brownies a slightly different flavor.
- Butter and vegetable oil: I like using both. Butter adds richness and flavor, while the oil helps keep the brownies moist and tender, even after they've cooled.
- Granulated and brown sugar: The combination helps balance sweetness, moisture, and chewiness. Heating the sugars with the chocolate and butter also helps develop that shiny brownie crust. If you're out of brown sugar, here's how to make your own brown sugar.
- Eggs: You'll need three large eggs at room temperature. Whisking them thoroughly into the chocolate mixture is important for the texture and glossy top.
- All-purpose flour: Measure carefully. Too much flour can make your brownies dry or cakey instead of fudgy. I recommend using a kitchen scale whenever possible.
- Cornstarch: This helps keep the brownie texture tender and contributes to that dense, fudgy bite.
- M&Ms: You'll need a 10-ounce bag. Regular or mini M&Ms both work, and you can experiment with different flavors or seasonal colors.
How to Make M&M Brownies
These brownies come together in a saucepan, so you won't need a stand mixer. The most important part is allowing the chocolate mixture to cool slightly before adding the eggs, then making sure you don't overmix after adding the flour.
- Prepare your baking pan. Preheat the oven to 350°F and line an 8×8-inch baking pan with parchment paper. Leave some overhang so you can lift the brownies out easily.
- Melt the chocolate, butter, and sugars. Add them to a saucepan over medium heat. Stir until the butter and chocolate are about halfway melted, then remove the pan from the heat. Continue stirring until everything is melted and combined.
- Add the wet ingredients. Allow the chocolate mixture to cool slightly so it isn't hot enough to cook the eggs. Add the oil, eggs, and vanilla, then whisk vigorously for about 3–4 minutes until the mixture is smooth and glossy.

- Add the dry ingredients. Stir in the flour, cocoa powder, cornstarch, and salt just until no streaks of flour remain. Avoid overmixing.
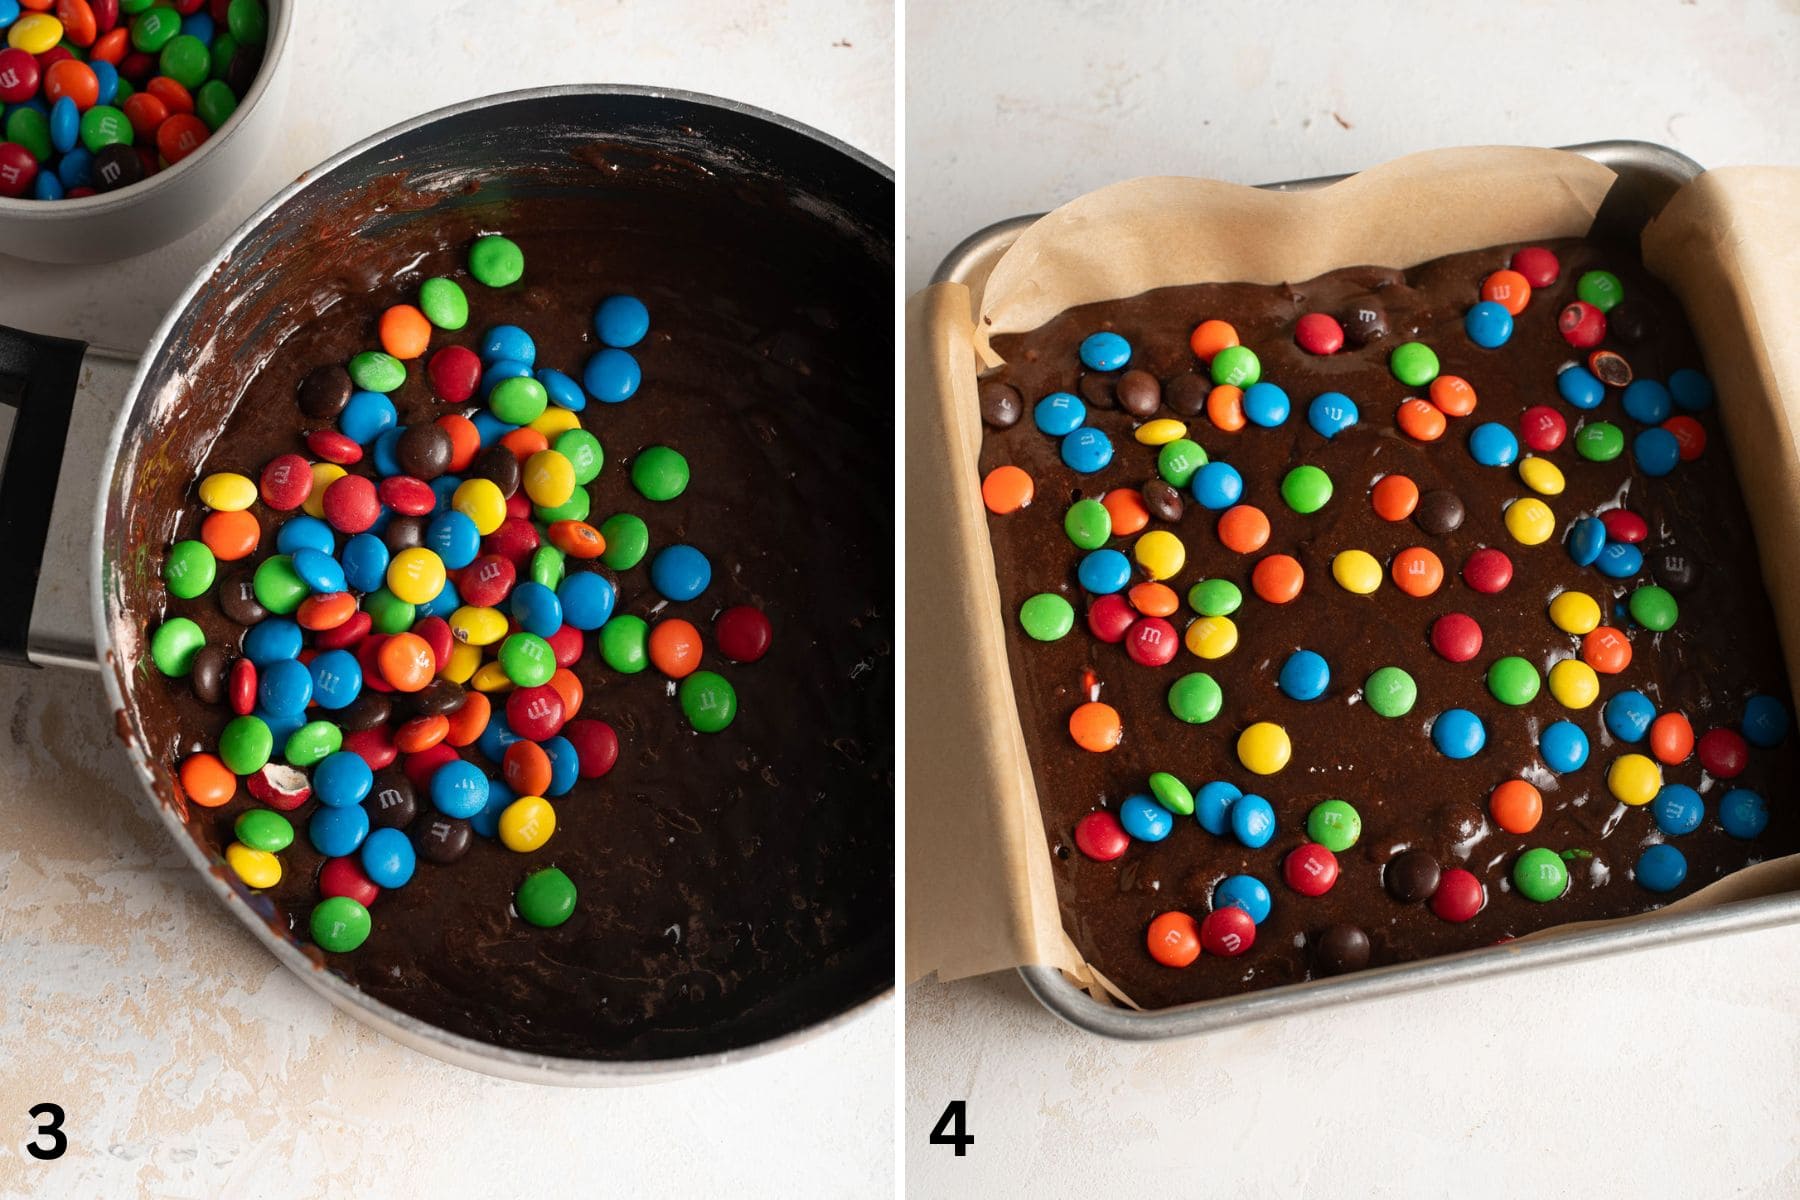
- Fold in the M&Ms. Gently fold about two-thirds of the candies into the brownie batter.
- Fill the pan. Spread the batter evenly into the prepared pan and scatter the remaining M&Ms over the top.
- Bake and cool. Bake for approximately 35–40 minutes, until a toothpick inserted into the center comes out with a few thick, moist crumbs, but no raw batter. Let the brownies cool in the pan for at least 10–20 minutes before lifting them out. Cool completely before slicing.

Amanda's Expert Baking Tips
After making as many brownies as I have, I've found that a few small details make the biggest difference between brownies that are wonderfully fudgy and ones that turn out dry or cakey.
- Measure your flour carefully. Adding too much flour changes the balance of fat and dry ingredients, which can leave you with a cakier brownie. Weigh your flour or fluff, spoon, and level it.
- Let the chocolate mixture cool slightly before adding the eggs. If it's too hot, you risk cooking the eggs before they're evenly mixed into the batter.
- Don't rush the whisking. Dissolving some of the sugar and thoroughly mixing the eggs helps create that beautiful shiny, crackly top. I recommend whisking for the full 3–4 minutes.
- Stop mixing once the flour is incorporated. Too much mixing at this stage develops gluten and can leave you with a tougher texture.
- Use a light-colored metal pan. It gives you more predictable results than dark metal or glass. Dark pans can cause the edges to brown more quickly, while glass can change how the brownies bake.
- Look for moist crumbs, not a clean toothpick. When testing the center, you want thick, fudgy crumbs clinging to the toothpick. Wet batter means the brownies need more time, while a completely clean toothpick may mean they've baked longer than necessary. Try to avoid testing directly through a melted chocolate candy.
- Let them cool completely before slicing. The brownies continue to set as they cool. I know it's hard to resist cutting into them immediately, but waiting gives you that dense, fudgy texture and much cleaner squares.
- Keep the M&Ms colorful. Fold them gently into the batter and reserve some for the top. This helps the candies remain visible instead of disappearing into the chocolate.

Storing and Freezing M&M Brownies
These brownies are easy to make ahead, which makes them especially useful when you're preparing several different treats for a party or holiday cookie assortment.
- Room temperature: Store in an airtight container for up to five days.
- Refrigerator: Keep in an airtight container for approximately one week.
- Freezer: Freeze the cooled brownies in a freezer-safe container, with parchment between layers, for over a month. Thaw overnight in the refrigerator.
For the cleanest slices, let the brownies cool completely before cutting and storing them.
Recipe FAQs
Look for a set top and edges that are fully baked. Insert a toothpick into the center, avoiding the M&Ms if possible. It should come out with a few thick, moist crumbs, but no raw brownie batter. Remember that brownies will continue setting as they cool.
Too much flour, overmixing after adding the dry ingredients, or baking too long can make brownies cakier or drier. Measure the flour accurately, mix only until combined, and avoid waiting for a completely clean toothpick.
Yes! I recommend increasing the recipe by 1.5 times. Because the larger pan spreads the batter across more surface area, the brownies will be somewhat thinner than the original recipe. Start checking them earlier and rely on the visual doneness cues rather than assuming they'll take the same 35–40 minutes.
Absolutely! You can experiment with mini M&Ms, peanut butter M&Ms, or other small chocolate candies. Keep in mind that larger filled candies can change the texture and how the brownies bake.
The key is helping the sugar dissolve into the batter and thoroughly whisking in the eggs. This recipe heats the sugars with the butter and chocolate before adding the eggs. Once the mixture has cooled slightly, give it a vigorous whisk as directed. That's what helps create the thin, shiny crust.

Related recipes


Recipe Card

M&M Brownies
Ingredients
- 5 ounces semisweet chocolate chopped
- 10 tablespoons unsalted butter room temperature preferred
- ½ cup granulated sugar
- ¾ cup brown sugar
- ¼ cup vegetable oil
- 3 large eggs room temperature
- 2 teaspoons vanilla extract
- 1 cup all-purpose flour
- ¼ cup Dutch-processed cocoa powder
- 2 tablespoons cornstarch
- ¾ teaspoon sea salt
- 10 oz M&Ms

Instructions
- Prepare the oven and baking pan. Preheat the oven to 350°F (175°C). Line an 8 × 8-inch baking pan with parchment paper, leaving enough overhang on the sides to lift out the finished brownies. I recommend a light-colored metal baking pan for the most predictable results.
- Melt the chocolate, butter, and sugars. Add the chopped semisweet chocolate, unsalted butter, granulated sugar, and brown sugar to a medium saucepan over medium heat. Stir frequently until the butter and chocolate are approximately halfway melted.
- Finish melting off the heat. Remove the saucepan from the heat and continue stirring until the chocolate and butter have melted completely and the mixture is smooth. Allow it to cool slightly so the mixture is no longer hot enough to cook the eggs.
- Add the oil, eggs, and vanilla. Add the vegetable oil, room-temperature eggs, and vanilla extract to the slightly cooled chocolate mixture. Whisk vigorously for approximately 3–4 minutes, until everything is thoroughly combined and the batter looks smooth and glossy. You can use a hand whisk or hand mixer to help incorporate the eggs thoroughly.
- Mix in the dry ingredients. Add the all-purpose flour, Dutch-processed cocoa powder, cornstarch, and sea salt. Stir gently just until no streaks of flour remain. Avoid overmixing, which can make the brownies tougher or more cakey.
- Fold in the M&Ms. Add approximately two-thirds of the M&Ms to the brownie batter. Fold gently until the candies are distributed throughout the mixture. Reserve the remaining third for the top.
- Fill the baking pan. Transfer the brownie batter to the prepared pan, spreading it evenly into the corners. Scatter the reserved M&Ms over the surface so the candies remain visible after baking.
- Bake the brownies. Bake for approximately 35–40 minutes, or until the edges are set and a toothpick inserted into the center comes out with a few thick, moist brownie crumbs attached. There should be no raw batter on the toothpick. Avoid testing directly through a melted M&M, which can make the result difficult to interpret.
- Cool the brownies in the pan. Allow the brownies to cool for at least 10–20 minutes before attempting to lift them out using the parchment paper. They'll continue setting as they cool.
- Cool completely before cutting. Let the brownies cool completely before slicing into squares. This is important for keeping their fudgy texture while allowing the bars to hold together cleanly.
Notes
-
Measure the flour accurately. Too much flour can make brownies dry or cakey instead of fudgy. I recommend weighing the flour or using the spoon-and-level method.
-
Use chopped chocolate. Semisweet or dark chocolate bars melt more smoothly than chocolate chips. I like dark chocolate for a richer flavor.
-
Don't overheat the chocolate. Remove the saucepan from the heat when the butter and chocolate are only partially melted. The remaining heat will finish melting everything.
-
Cool slightly before adding eggs. The chocolate mixture should be warm but not hot enough to cook the eggs.
-
Whisk for the full 3–4 minutes. Thoroughly incorporating the eggs and helping dissolve the sugar contributes to the brownies' shiny, crackly top.
-
Stop mixing once the flour disappears. Overmixing after adding the dry ingredients can make the brownies tougher.
-
Reserve some M&Ms for the top. Fold approximately two-thirds into the batter and scatter the rest over the surface.
-
Check for thick, moist crumbs. A completely clean toothpick can indicate overbaking, while wet brownie batter means the brownies need more time. Avoid testing through a melted candy.
-
Cool completely before cutting. These brownies continue setting as they cool. Cutting them too early can make them difficult to handle.
-
Storage: Store in an airtight container at room temperature for up to 5 days or in the refrigerator for approximately one week.
-
Freezing: Freeze cooled brownies in an airtight container with parchment paper between layers for over a month. Thaw overnight in the refrigerator.
-
Scaling: For a 9 × 13-inch baking pan, increase the ingredients by 1.5 times. The brownies will be somewhat thinner than the original, so begin checking earlier and use the visual doneness cues rather than the original bake time.


Leave a Reply